Cloud Cost Management
Introduction
Cloud Cost Management (CCM) is a feature that allows you to explore in detail the cost generated by your cloud infrastructure.
It provides a graphical interface to allow anyone within an organization to better visiualize, manage and explore the cloud expenses across your different providers.
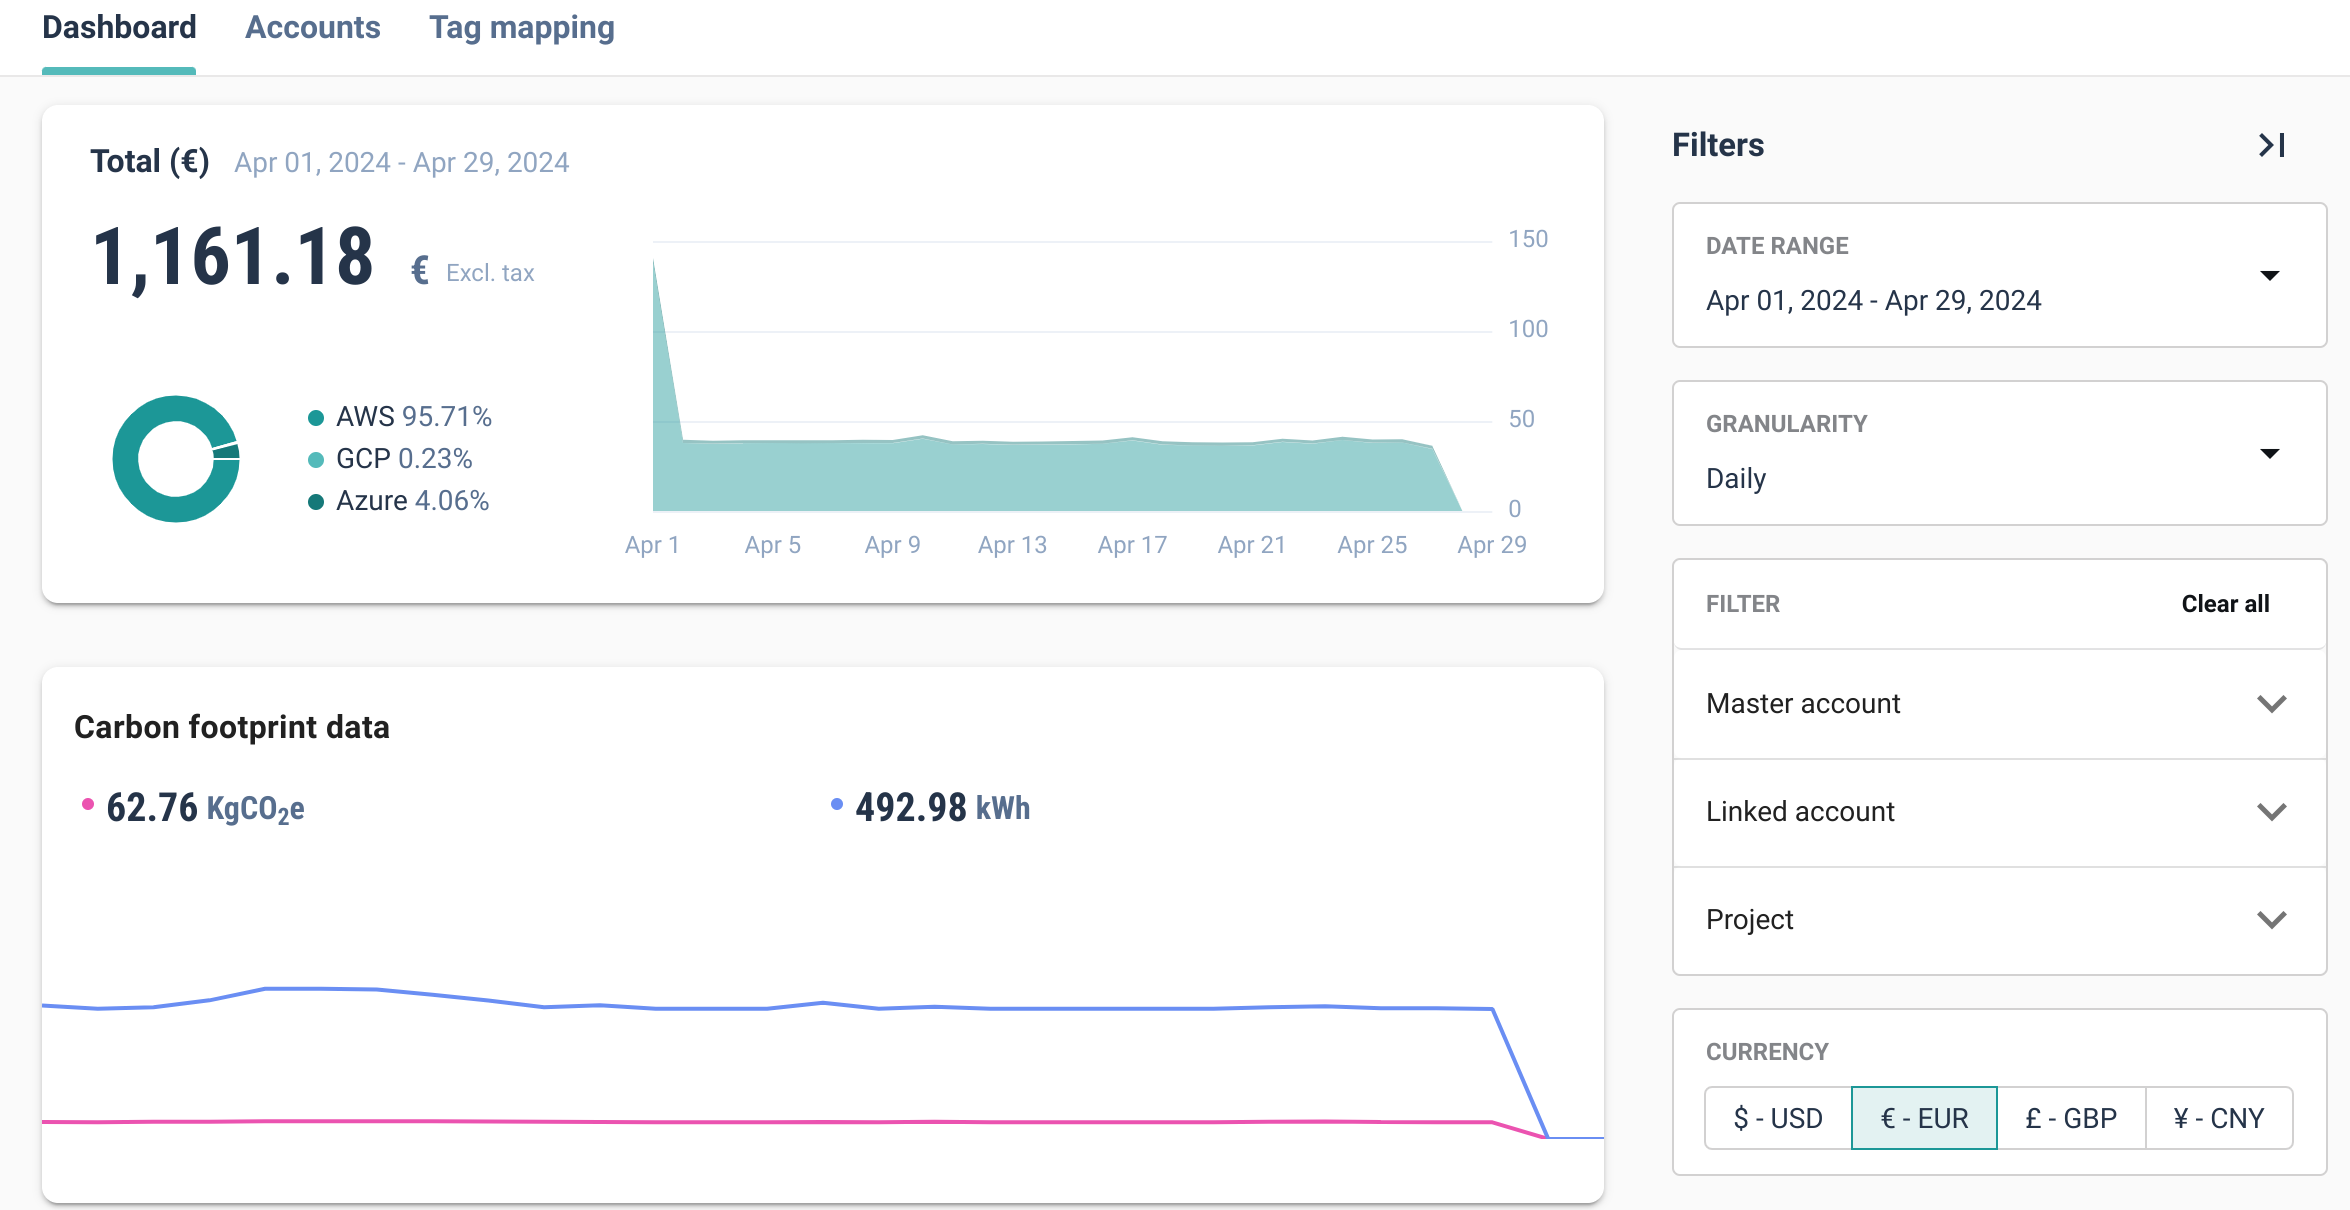
In a nutshell this tool starts by retrieving your data from your cloud providers and then you can visiualize and analyse it, thanks to its dashboard.
In the following sections, you'll learn about how to start using Cloud Cost Management and all its features.
Whithin this feature is integrated our cloud carbon footprint tool, allowing you to visiualize your cloud carbon footprint data alongside your costs. For that reason, you cannot choose to opt-out of carbon footprint data when using the CCM.
Pre-requisites
In order to use this feature you need to have the rigth access keys to be able to connect to the cloud provider and extract the data required.
This access keys will be stored as a cycloid credential to allow the Cloud Cost Management (CCM) account to access the cloud provider data. For more informations regarding credentials, please refer to the corresponding section here.
As of now there's 3 cloud providers that are supported in CCM, that is AWS, GCP and Azure. New ones can be integrated if needed, don't hesitate to reach out to us if this is your case.
In the following table you have a summary of the providers supported, the data retrieved and instructions on how to configure the cloud access keys for CCM.
CCM with AWS is based on the aws cost and usage report (CUR). It uses the generated reports to retrieve the data about your cloud consumption.
To use CCM using AWS there's only 2 things that you will need to prepare:
- Setup cost and usage report (CUR)
- Create an AWS Access key with the rigth permissions
1. Setup cost and usage report (CUR)
The AWS CUR contains the most complete set of your AWS costs and data publishes. It works by publishing a AWS billing reports to an Amazon Simple Storage Service (Amazon S3) bucket that you own.
The old depracted version aws-detailed-billing-report is also supported by CCM.
To use CCM you first need an initial AWS billing report, from which the CCM will retrieve the data of your cloud costs.
You can follow AWS official tutorial acessible here.
Access to the billing console is restricted by default on AWS and needs to be granted by an administrator. In case of issues, the troubleshooting guide is here.
Here are the configurations to choose while following the AWS tutorial:
- In the first step select the options
Include resource IDsandAutomatically refresh your Cost & Usage Report when charges are detected for previous months with closed bills - Concerning
time granularitydo not select Monthly as this will severely restrict the capabilities of CCM. Use insteadHourlyorDaily - No need to
Enable report data integration forany other system, CCM only needs the files generated by the CUR - All
Compression typesare supported, you can leave the default one or chose a different one
After the S3 bucket and report are created, keep in mind the bucket name, its region, as well as the location of the manifest file within the bucket.
This will be required during the setup of the CCM account.
2. Create AWS Access key
As you will see, the procedure to create a Cloud Cost Management account starts by selecting or creating a cycloid credential containing the access keys, in this case for AWS.
This access key needs to have access to the S3 bucket where the reports will be stored, as it was configured before.
To do this you'll need to create an IAM user with an access key and attach an IAM permission policy to it, to enable certain rigths for this user.
As of now CCM doens't support AWS IAM roles, so you'll need to create a user and access keys with permissions as we saw above.
Creating the IAM user should be quite straigthforward, you can follow the AWS official tutorial on how to do in the AWS console available here.
Tips when creating the user:
Don't select the option to Provide user access to the AWS Management Console, since the user will be a machine user that will not require login in aws console.- Associate the
IAM permission AmazonS3ReadOnlyAccessto the user directly. Optionally if you want to have minimal permissions possible you can create an IAM policy with the following permission{
"Version": "2012-10-17",
"Statement": [
{
"Sid": "VisualEditor0",
"Effect": "Allow",
"Action": [
"s3:GetObject",
"s3:ListBucket",
"s3:GetBucketLocation"
],
"Resource": [
"arn:aws:s3:::<YOUR_BUCKET_HERE>",
"arn:aws:s3:::<YOUR_BUCKET_HERE>/*"
]
}
]
}
After creating the user you should create the access key to be used, you can do this by following the AWS official tutorial here.
Don't forget to save the access key somewhere, since you'll have to add it to a cycloid credential later.
CCM with Azure is based on the Microsoft Azure Cost Management. It uses the data exports to allow to integrate your cloud costs into CCM.
To use CCM using Azure there's only 2 things that you will need to prepare:
- Verify Azure storage account
- Create an Azure Cost Management export
1. Verify Azure storage account
As you will see, the procedure to create a Cloud Cost Management account starts by selecting or creating a cycloid credential containing the access keys, in this case for Azure.
This corresponds to the access key of your storage account. It will be used to connect to your azure account from cycloid.
In case you still don't have one created, you can consult the official documentation about how to create one here.
Don't forget to save the access key and storage account name, since you'll have to add it to a cycloid credential later.
If you rather you can also create the storage account simultaneasly to when you create the Azure Cost Management export
2. Create an Azure Cost Management export
To be able to do this you need to make sure that your Azure user, or the one you will use to create the Azure Cost Management export, has the required permissions.
You can quickly check this by checking your user role in the Azure resource group associated to the storage account mentioned in the previous section. You can find the azure official tutorial on how to this here.
Some of the acceptable roles are: Owner, Contributor or Cost Management Contributor.
If you have another role just make sure that it has the permissions to create and update exports of Cost Management.
Once you have verified the roles associated to the user you can create the Azure Cost Management export in the azure portal, by following the steps bellow:
- Go to the
Cost Management + Billingfrom the portal menu - Then select the
Cost Managementtab on the left - On the Menu on the left, navigate to the
settingssection and click onExports - Now you just need to create the export by clicking on the
+ Createbutton. Doing this should be quite forward, pay only attention to the following options: 4.1 Select for the parameterFrequencythe optionDaily exports of month-to-date costs4.2 Select the storage account create before or opt for creating a new one
In case of any issue you can find the complete official guide here.
Once you finishing up creating the export, remember that it takes a few hours for the export file to be ready in the storage account's container.
Don't forget to save the export name and also the container name somewhere, since you'll have to add it to a CCM account later.
CCM with GCP is based on the Google Cloud billing data exports. It uses the generated exports to BigQuery to retrieve your billing data of GCP
To use CCM using GCP there's only 2 things that you will need to prepare:
- Create a service account
- Setup cloud billing data export to BigQuery
1. Create a service account
As you will see, the procedure to create a Cloud Cost Management account starts by selecting or creating a cycloid credential containing the access keys, in this case for GCP.
This corresponds to the service account key to be used by CCM. It will be used to connect to your GCP account from cycloid.
You can consult the official GCP documentation about how to create a service account here.
Feel free to follow the tutorial is quite straigthforward just remember to assoicate the following IAM roles to the service account:
roles/billing.viewerto allow accessing the associated GCP projectroles/bigquery.dataViewerto allow access to the costs data
Once you have created the service account you need to create the key that will be used by CCM to connect to your GCP account data.
Doing this is quite easy, you can follow the GCP official tutorial here.
Just remember to select JSON as the Key type.
Don't forget to save the access key json file generated, since you'll have to add it to a cycloid credential later.
2. Setup cloud billing data export to BigQuery
If billing export is not already configured for your project, you can go on GCP console and lookup for the billing accounts page.
Once in this page, click on the on the billing export in the left menu.
Then you can enable the export by configuring the different types of data to export.
In the case of CCM, it is required to enable detailed usage cost data since its the most complete data and hence the one that allows for a more accurate analysis of your costs.
For this click on edit settings of detailed usage cost. You can then follow the official setup tutorial here.
- Be sure to check that you have the rigth access to enable the data export! You must at least have the roles: roles/billing.costsManager or roles/billing.admin and roles/bigquery.user
- Verify that
BigQuery Data Transfer Service APIis enabled. You can do this by following the tutorial here
Once you finish enabling the export, don't forget to save the project ID, the billing dataset and also the billing account ID somewhere, since you'll need it to configure the CCM account later.
Quickstart
Before advancing with this tutorial, make sure to verify that you have all the pre-requistes as defined in the section above of this page.
To start you need to setup a Cloud Cost Management account.
For this you should:
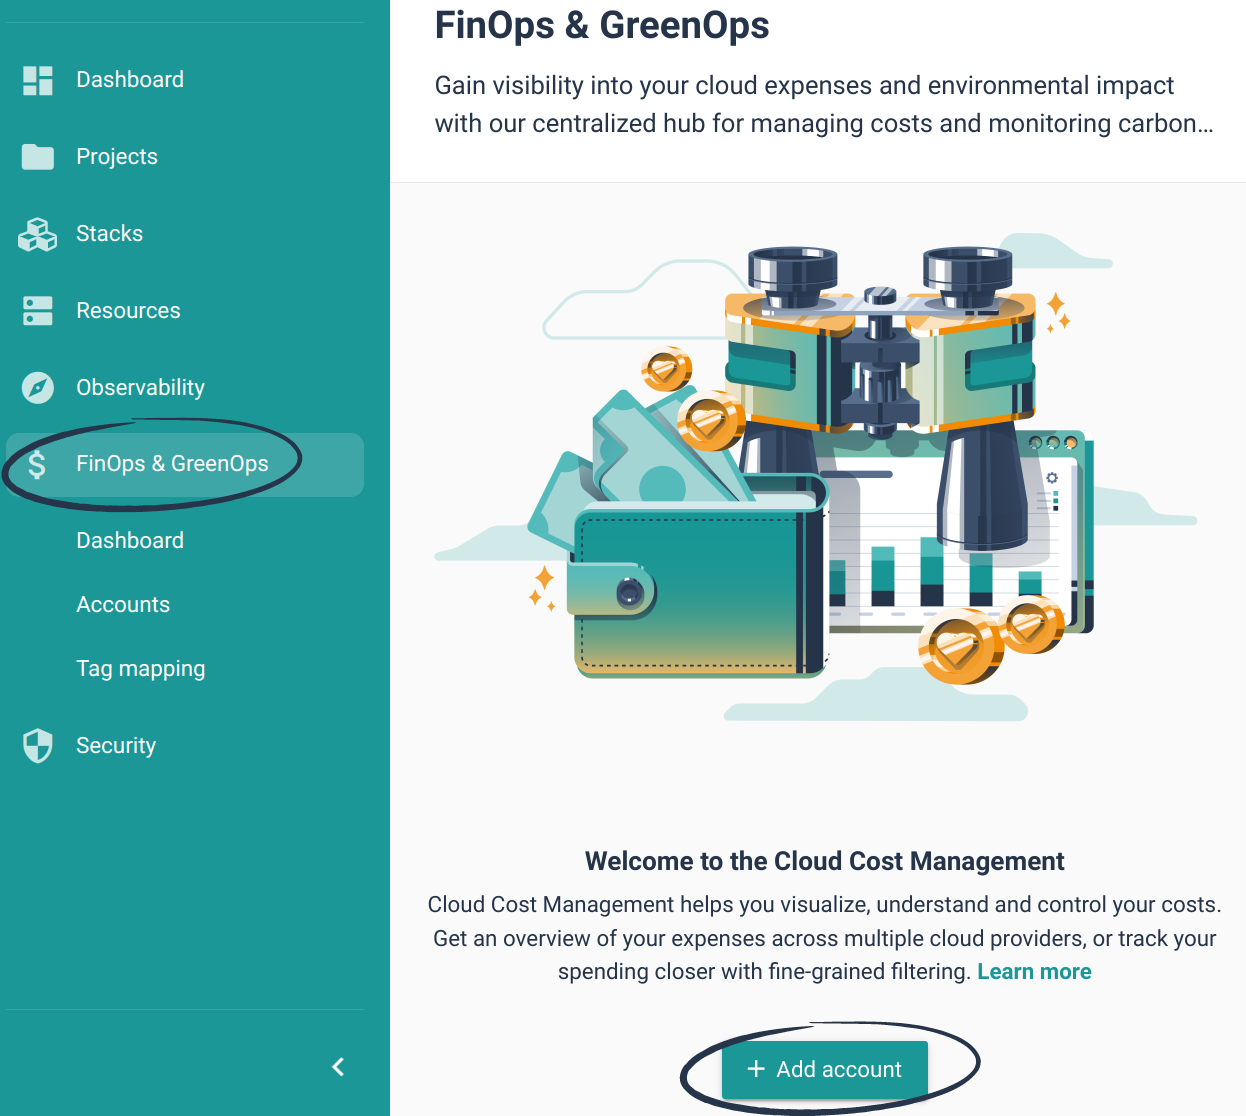
- Navigate to the
FinOps & GreenOpssection in the Cycloid UI. - Click on the button
Add account, this will bring to the menu of your existing credentials.
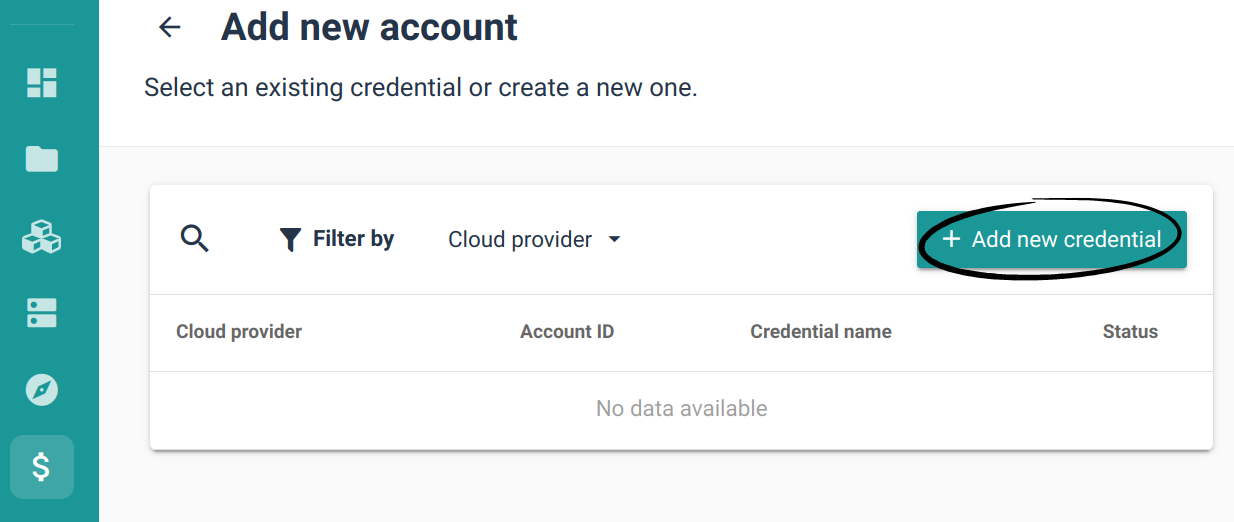
- Create a new cloud credential by clicking on the button
Add new credential(In case you have previously created one you can just select the credential from the list and skip to the point 5 of this tutorial).
-
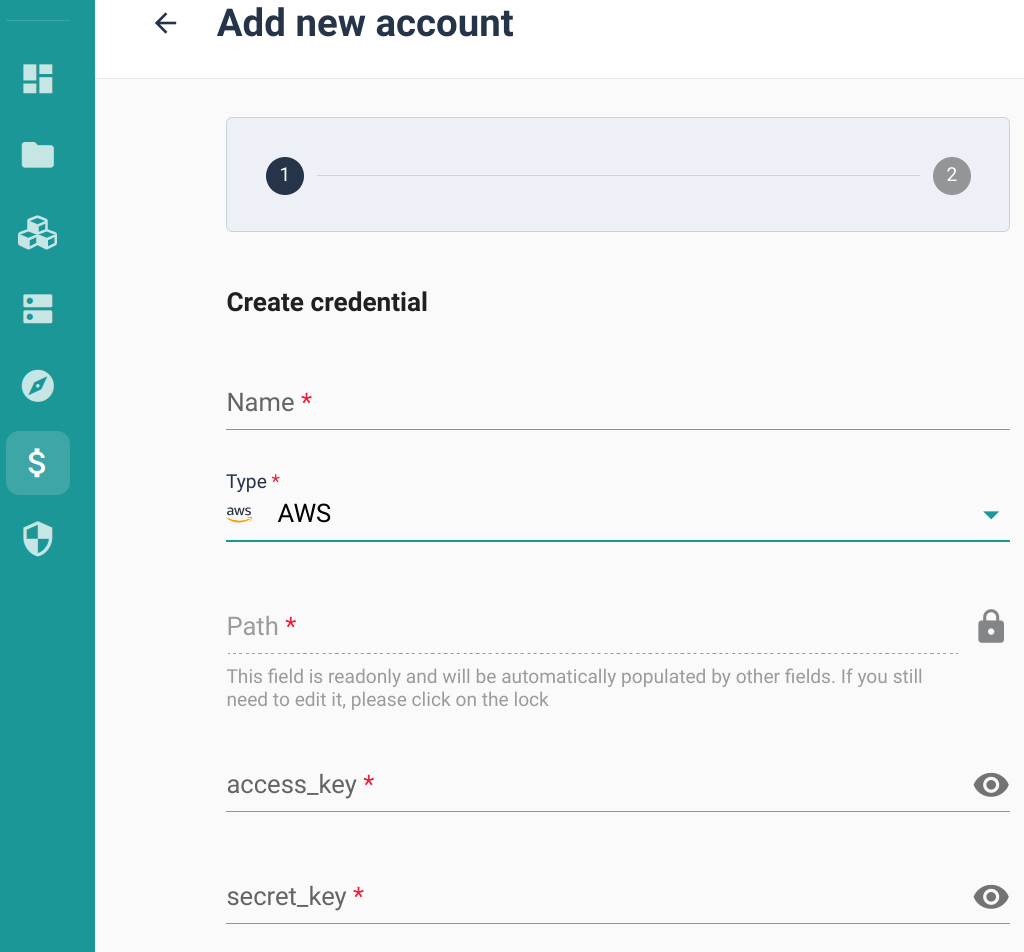
You should then define a
nameto associate to the credential, select thetypeof Provider (AWS, GCP or Azure) and depending on the type selected differentcredentials parameterswill be required.Depending on your provider different parameters are required to collect the data, as mentioned during the pre-requisites section:
In the case of AWS you should specify the access key previously created in the parameters access_key and secret_key, as you can see in the image bellow.
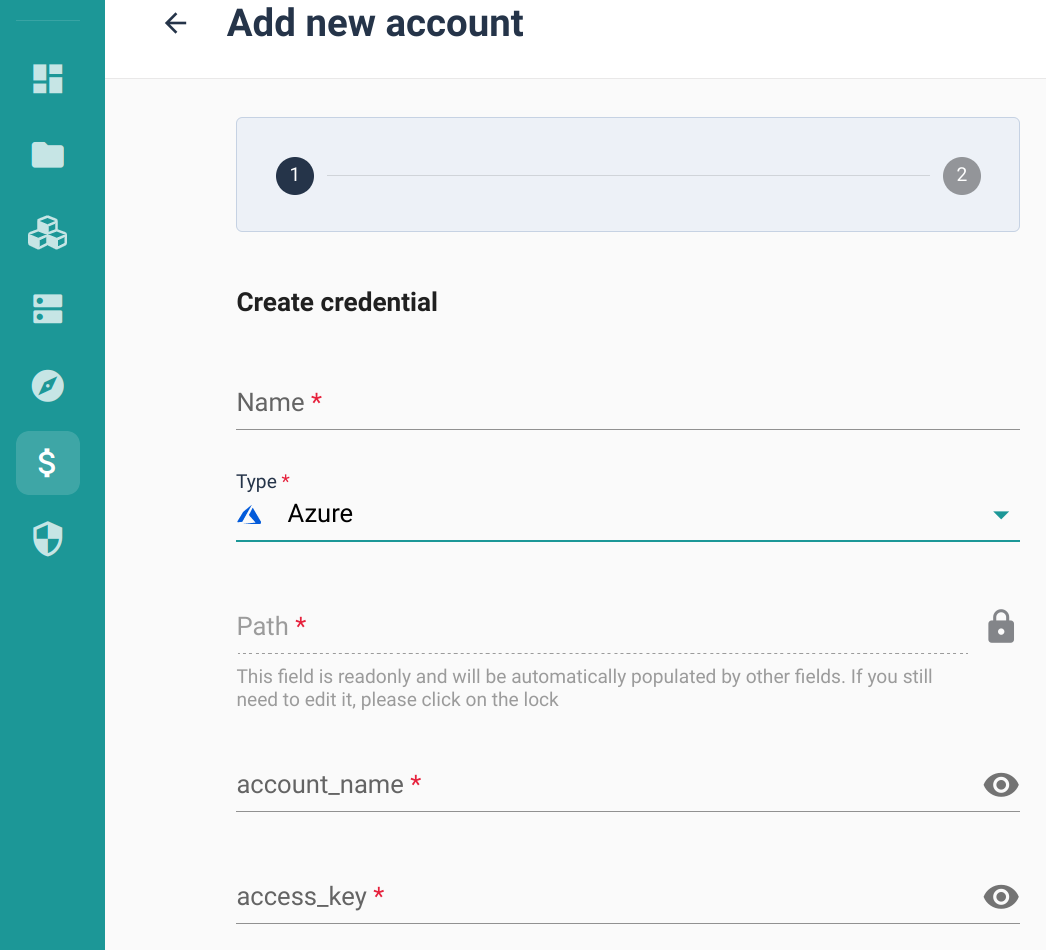
In the case of Azure you should specify the access key and storage account name previously created in the parameters account_name and access_key, as you can see in the image bellow.
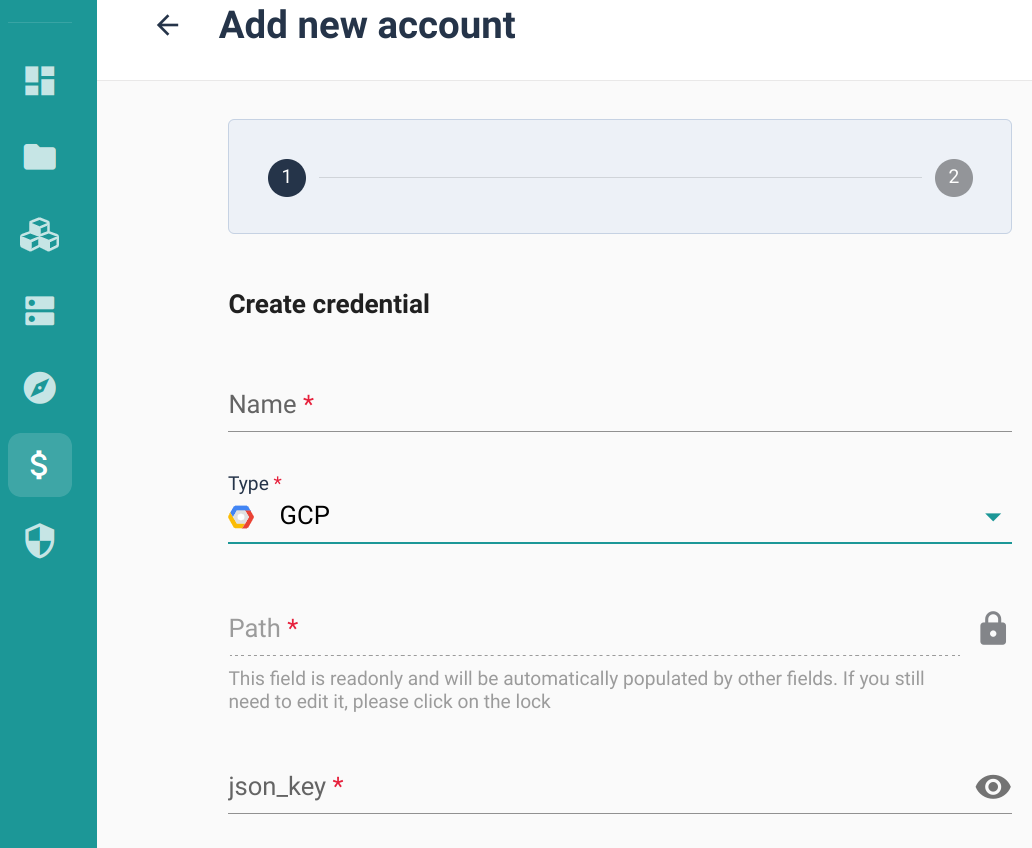
In the case of GCP you should specify the access key in json format previously created in the parameter json_key, as you can see in the image bellow.
When creating a new credential a notification will apear in the top rigth corner indicating if the creation was successfull or not. Please report to the credentials section of this documentation in case of issues.
- After you succeffully selected or created the new credential you can click in the
continuebutton, that will lead you to the second part of the account configuration. Here depending on the provider you'll have to specify the required parameters so that CCM can retrieve your cloud cost data.
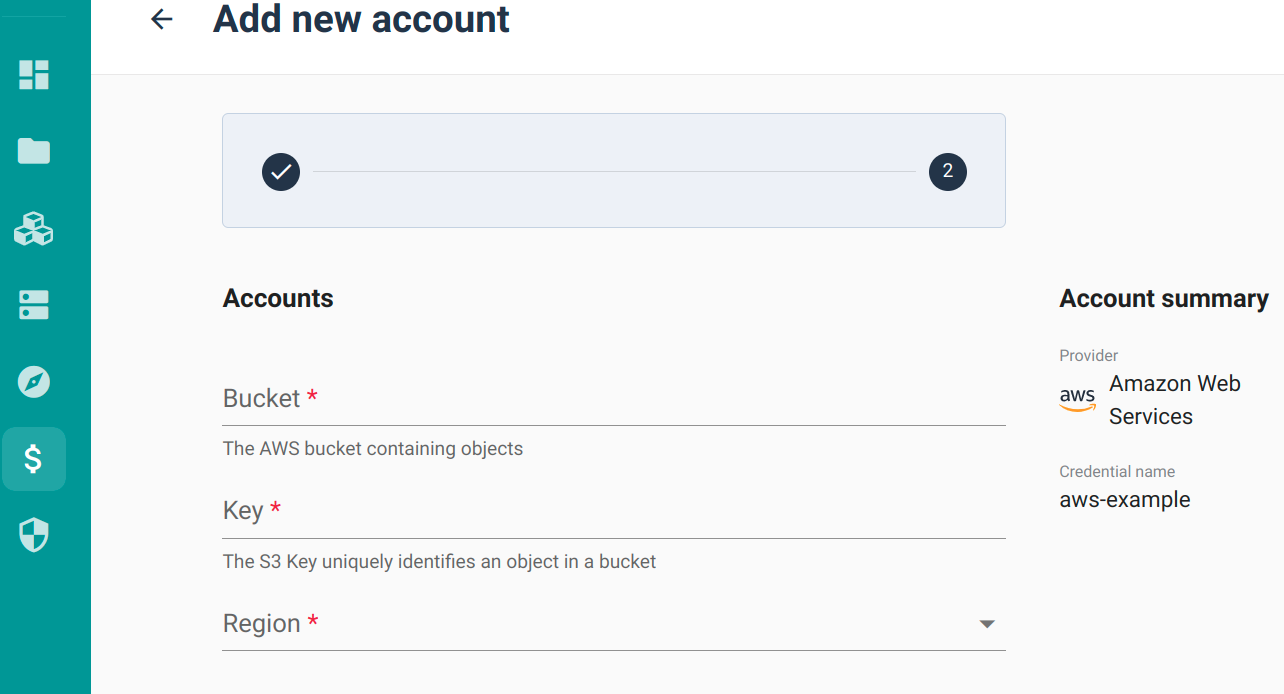
In the case of AWS you should specify the location of the CUR report, as we saw during the prerequisites section above.
You should specify the parameters bucket name, the location of the manifest file within the bucket, e.g, /folder/report-manifest.json and select the bucket region from a dropwdown menu.
You can find more than one manifest file in the bucket, and you can choose any of them. Each time a new batch of billing files is generated, they are accompanied by a manifest. The manifest file in the account configuration is needed to differentiate between the legacy and current version of the report since the AWS API does not support that and to jump-start the import.
In case you lost this data you can easily retrieve it, by searching Billing and Cost Management, then scroll on the left menu to Data exports. This will show all the exports, just select the one you're interessed and you can edit it to see the data under the Data export storage settings.
In the case of Azure you should specify the location of the data export from the Azure cost management,as we saw during the prerequisites section above.
You should specify the container name and the prefix corresponding to the path of the files generated, in the format storage directory/exportName.
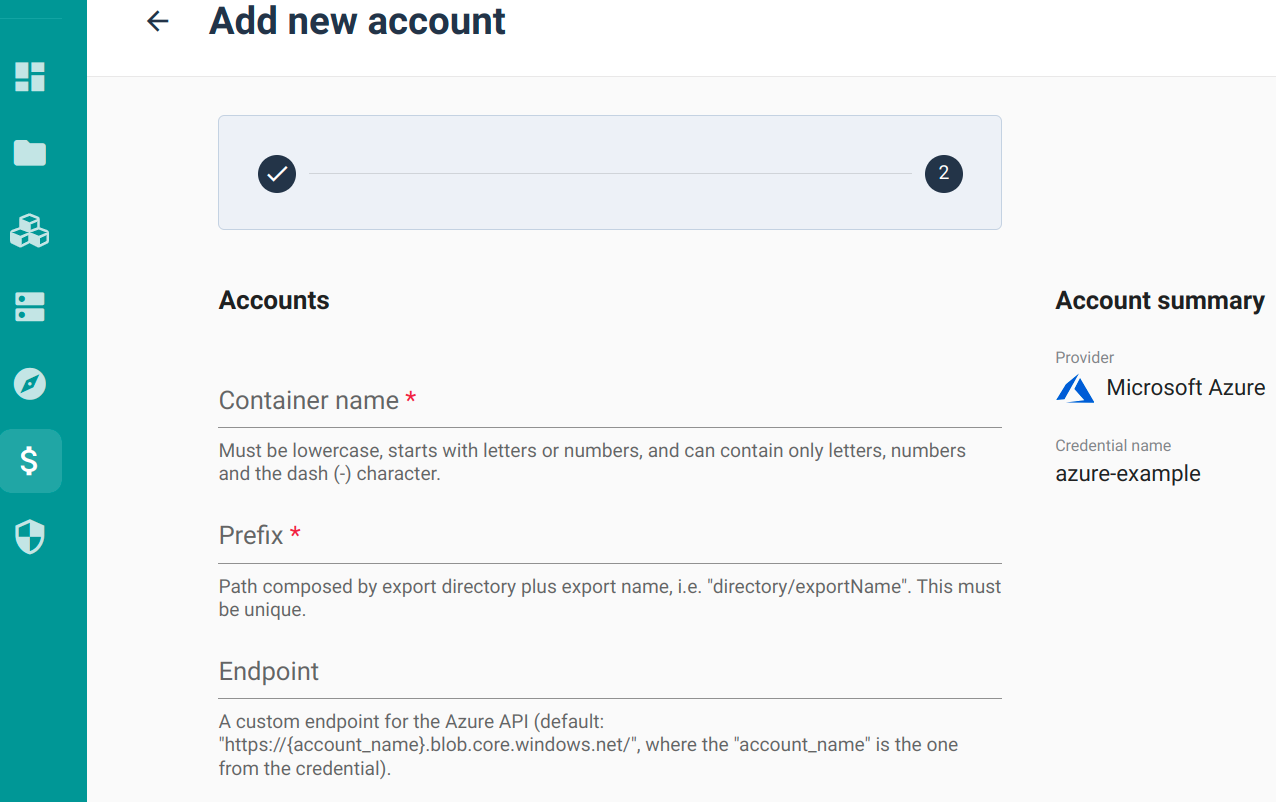
In case you lost this data you can easily retrieve it, by goint to Cost management | Exports, click on your export, and check both Storage directory and Name. If, for example, your Storage directory is type daily and named MyFirstExport, then your prefix will be daily/MyFirstExport.
In the case of GCP you should specify the GCP exports of your billing data in BigQuery,as we saw during the prerequisites section above.
You should select the project ID, the billing dataset and the billing table to use within the dropdown menu.
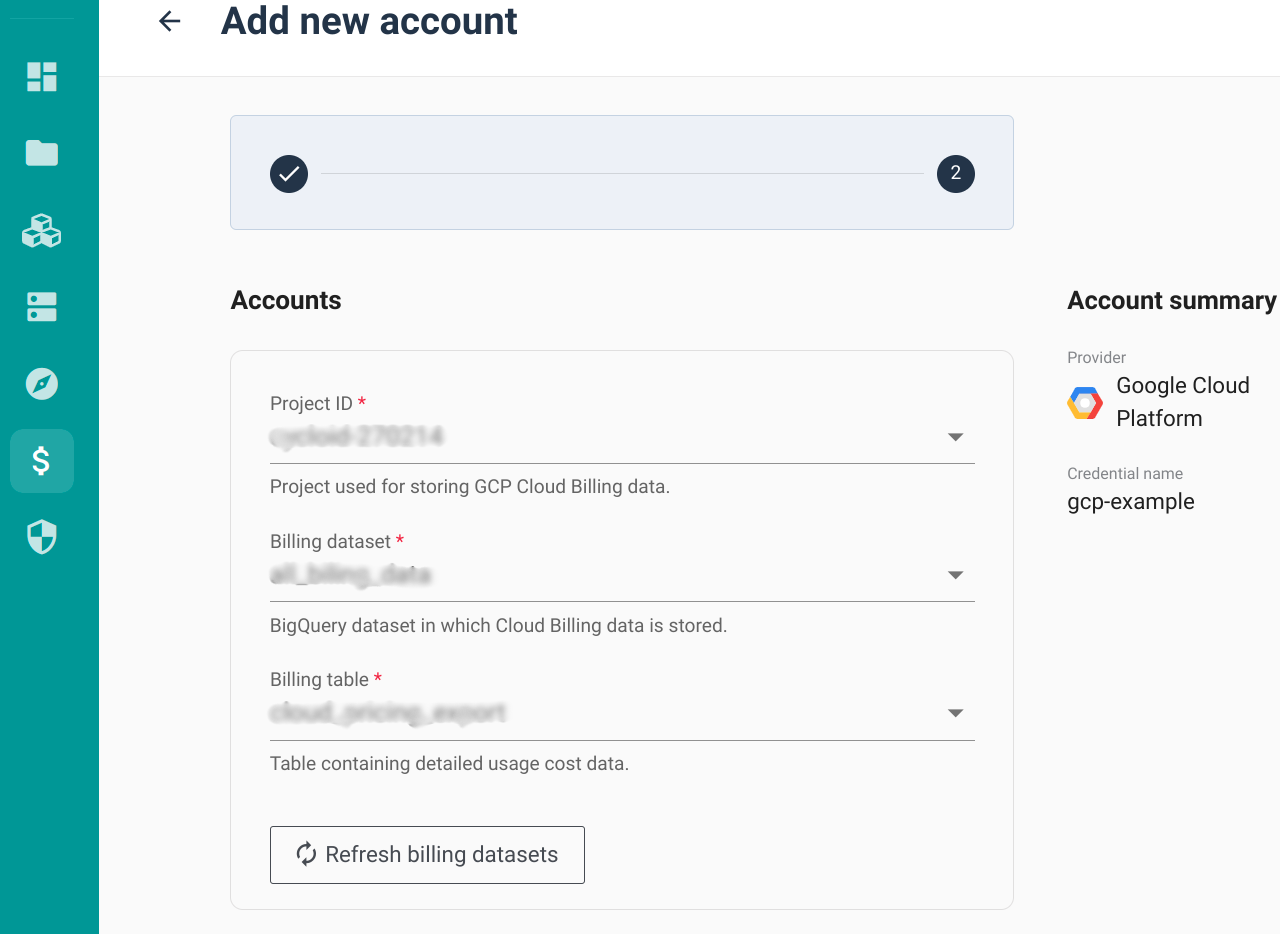
In case you lost this data you can easily retrieve it, by goint to billing accounts, scroll down on the left menu to billing exports. Here you'll be able to see the billing dataset data. If you then click on it you'll be able to get the billing table data.
- After the account is created, an initial data ingestion starts to retrieve your cloud billing data. Depending on the data volumetry it can take up to several minutes to ingest but is generally quite fast 😃
Finally with the data ingestion finish, you'll be able to start using all the CCM features 🚀
Feel free to explore the CCM interface yourself or check the concepts section of CCM docs to have a deep dive into all the different tabs of this feature.


