# File format
To configure your project via a user-friendly form, you'll need to create a new file at the same location as your .cycloid.yml file; this one is called .forms.yml
The .forms.yml file allows the creation (or update) of a project via a nice interface. It allows for an easier and more controlled configuration of stacks: restrict the values provided, variables exposed, range, etc.
The overall structure layout can be represented via this definition:
version: "2"
use_cases:
- name: use-case-N
  sections:
  - name: section-A
    groups:
    - name: group-1
      technologies: [terraform]
      vars:
        # vars definition here
  [...]
2
3
4
5
6
7
8
9
10
11
For an extended list of examples, please see the examples section directly.
# Use-case, Section & Group definition
The structure must respect the following:
- use-case: it must match the .cycloid.yml file use-cases definition.
- section: these are just logical grouping entities, that allows to more easily split the variable and understanding of the configuration
- group: these serve two purposes - logical grouping entities, and configuration that will apply to variables of the group (see explanation below)
- var-definition: please see the next section for an extended description of the format
As previously mentioned the use-case should match the one from the .cycloid.yml file, if a use-case present in the stack file isn't present in the .forms.yml one, you won't be able to configure it and you'll have to use the legacy interface instead for that use-case.
The sections and groups allow you to split your configuration into logical categories, you are free to pick any name for those. You could for example have a section dedicated to your Application, and then groups specific for each service: Cache settings, Versions to use, Database parameters, etc.
However, group's definition not only contains the list of variables but also the technologies for which this configuration applies. For more deatils, please see the sharing of technologies section.
# Attribute definition
Attribute definition includes many more fields, not all of which are mandatory or have the same constraints.
| Attribute | Type | Required | Description |
|---|---|---|---|
| key | string | yes | key is the name of the attribute located in the sample files from .cycloid.yml file. See notes about key attribute |
| name | string | yes | name of the attribute displayed to the user |
| type | string | yes | the type of data handled |
| widget | string | yes | the widget used to display the data in the most suitable way |
| default | any | no | the default value to assign to the attribute if nothing is set by the user (used when required). Matches the type |
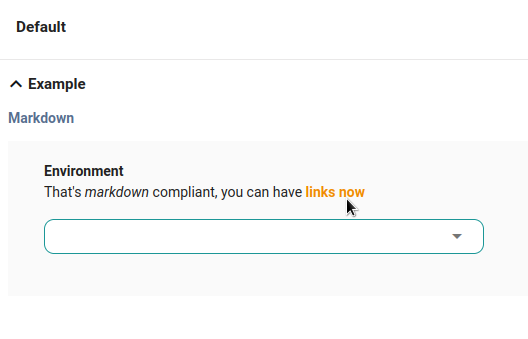
| description | string | no | description helping users understand the interest/impact of such variable/change. This supports markdown format (opens new window), so you can easily insert bold, italic or links into the description of your varaible. |
| required | boolean | no | whether or not the attribute is required |
| source | string | no | source is only used for the branch widget, see the section for more details |
| unit | string | no | unit to be displayed for the attribute, helping to know what's being manipulated amount of servers, storage in Go, users, etc |
| validations | array | no | list of validations to apply on the field |
| values | any | no | list of allowed values, please check the possible types |
| values_ref | string | no | URL to a remote location that will return a JSON that will be used as values, can be used anywhere values is used |
Here is an exmaple on how you could use markdown in your descriptions:
info
The default attribute for cy_cred widget might have a different format depending of the technology
- ansible:
cred_path/field - pipeline:
((cred_path.field))
# Key attribute
The key format to respect for ansible and pipelines is: keyX, where keyX is the name of the variable you want to replace.
Basically Cycloid will look for variables present in your samples, for each technology that has variables matching the keys that you've given.
For Terraform however, there are 2 ways to use a key:
- the "short" way (identical to ansible/pipeline):
keyX. This works for every module existing which have such key. - the "long" one
module.Y.keyXfor terraform. Works for setting up the specific variable of a module.
Warning
In the previous version of the forms, the "short" version would work only with one module, while the long one would still be for a specific one.
Example:
If you create a variable with the key servers this will be applied to both "frontend" & "backend" modules.
While if you wanted to modify only the "frontend" servers, then you'd have to specify the key module.frontend.servers.
module "frontend" {
  source = "./app-cluster"
  servers = 5
}

module "backend" {
  source = "./app-cluster"
  servers = 5
}
2
3
4
5
6
7
8
9
# Type attribute
The type constraints will ensure that the data provided matches the expected type. If you passed a string instead of a number, an error would be triggered.
The same applies if you set a default or values that do not respect the type.
The list of supported types:
- integer: an integer number
- float: a float number
- string: any type of string
- array: any type of array (number, string, etc)
- boolean: true or false
- map: any type of map
- raw: any content which is valid YAML/HCL depending on technologies
The map type can be displayed as JSON but is properly converted to/from YAML/HCL when stored and retrieved.
The raw type is meant to be used for data that is too complex to be represented easily with the other type.
It will be written to the files directly as such, but still has to be valid YAML (for pipelines/ansible technology) or
valid HCL (for terraform).
# Map attribute & mapped values
It can happen that when using the form, you'd want to rather display some text instead of a specific value which might not be very obvious to users. e.g: L instead of m5.large
To achieve this, you'd need to use the map type, with values & defaults formatted differently, as they would need to include label (the text displayed) and value (the associated value) fields.
See the table of Widget/Type & Values constraints to know which widget allows you to use it.
For example, let say that you wanted to use various instance flavors for your users to pick from, you could do:
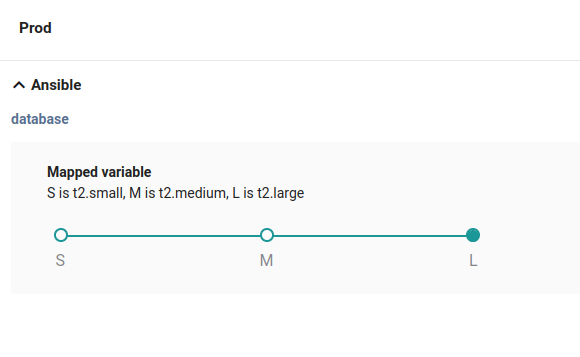
This way the user would only see "simple" and more understandable names, instead of some more technical terms which can be confusing to pick from.
# Widget attribute
The widgets are meant to provide easy configuration for the most common type of data. Some extras have been added to cover some elements used in Cycloid.
| Widget | Render |
|---|---|
| auto_complete |  Provides suggestions while you type into the field |
| cy_cred | 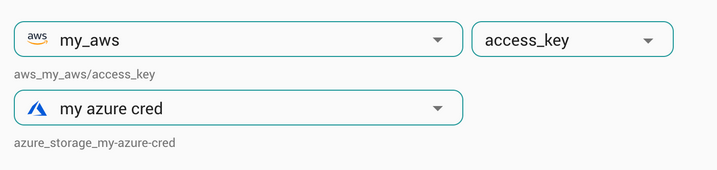 Expose cycloid credentials available |
| cy_scs |  Expose cycloid catalog repositories available |
| cy_crs |  Expose cycloid config repositories available |
| cy_branch | 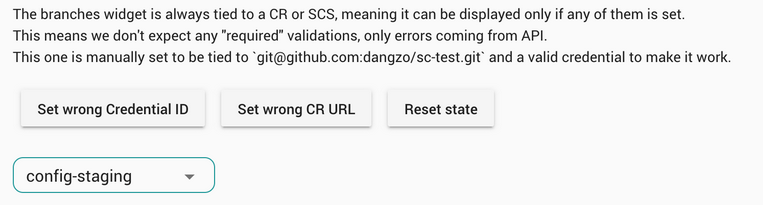 Expose branches available from cy_scs or cy_crs |
| cy_inventory_resource |  Select a resource attribute from the inventory and link the value to this asset |
| dropdown |  Menus display a list of options |
| number |  Simple field dedicated to numbers |
| radios |  Graphical control element that allows the user to choose only one of a exclusive options |
| simple_text |  Simple field dedicated to text |
| slider_list |  Select option by dragging a slider along list of options |
| slider_range |  Select option by dragging a slider along a range |
| switch |  Choosing between 2 positions on/off |
| text_area |  Multi-line text field |
As you might have noticed, a couple of those widgets are "special". By special, we mean that they aim to simplify using Cycloid entities. In our case: credentials, service catalog, config repositories, and/or branches. To help identify them, we have prefixed them with cy_.
The cy_branch is the only one that uses the variable source because to be able to select it, we need to know which repository to request.
This is why the source must reference a valid key that belongs to either a cy_scs or cy_crs variable. If this isn't the case, an error will be triggered.
# Widget/Type & Values constraints
Due to the nature of widgets, there are limitations applied to the types & values accepted. Here is a summary of all supported couples:
| Widget | Type | Values |
|---|---|---|
| auto_complete | string | Needs at least 2 values, which are hints rather than restrictions |
| cy_cred | string | |
| cy_scs | string | |
| cy_crs | string | |
| cy_branch | string | |
| cy_inventory_resource | string, array | |
| dropdown | any but raw | At least 1 values, if Boolean only 2 allowed |
| number | integer, float | |
| radios | any but raw | At least 1 values, if Boolean only 2 allowed |
| simple_text | string | |
| slider_list | string, boolean, integer, map | At least 1 values, if Boolean only 2 allowed |
| slider_range | integer | Only 2 values accepted, mininimal value first then maximum |
| switch | boolean | Does not take any values |
| text_area | any |
# Default attribute
Default value is the one that will be automatically selected when creating the project for the first time. Once it has been created, if you were to edit it then the value selected would be the one you previously picked.
# Default raw type case
Variables of raw type are considered strings to avoid YAML or HCL formatting.
Thus if you want to specify raw complex (multi-line array, map, etc) default values, you have to use a YAML formatter to avoid modifications too.
YAML has several multi-line formatter (>, >+, |, |-, etc), the ones that we advise using is: |+.
This is because the formatter |+ will write exactly the string as it is given, which fits best with the concept of raw variable.
Some others could also work, but you have to be careful with the one you use, as it could slightly change the output of the given variable.
| if you want to trim extra unnecessary new lines at the end. If you leave 3, they will be replaced by one.
|- would strip any new lines at the end.
More info on: https://yaml-multiline.info/ (opens new window)
Example:
  - name: "Ansible params raw"
    description: "Parameters of ansible-runner script (raw). Can be found here: https://github.com/cycloidio/cycloid-images/tree/master/cycloid-toolkit#ansible-runner"
    key: ansible_params_raw
    widget: text_area
    type: raw
    default: |+
      SSH_JUMP_URL: user1@Bastion1
      SSH_PRIVATE_KEYS:
        - ((ssh_bastion.ssh_key))
      ANSIBLE_VAULT_PASSWORD: ((raw_ansible_password))
      ANSIBLE_PLAYBOOK_PATH: ansible-playbook/
      ANSIBLE_PLAYBOOK_NAME: playbook.yml
      EXTRA_ANSIBLE_VARS:
        customer: ($ organization_canonical $)
        project: ($ project $)
        env: ($ environment $)
2
3
4
5
6
7
8
9
10
11
12
13
14
15
16
# Validations
# Understanding Regexp Validation
Regular expressions (regex or regexp) are used to match patterns within text. By leveraging regex, you can specify particular patterns that data must adhere to, providing a high degree of control and flexibility for data validation.
# Feature Highlights
This feature is currently limited to simple_text widgets. If you use this widget in your Stackforms application, you can now apply intricate data validation patterns to your text fields.
# How It Works
With Stackforms, implementing regexp validation for your simple_text widgets is straightforward. You can define custom regexp patterns in your .forms.yml file for each field. If the entered data doesn't match the specified regular expression, Stackforms will display a predefined error message.
  - name: "variable with validation"
    description: "this is a string"
    key: "key-one"
    widget: simple_text
    type: string
    required: true
    validations:
      - regexp: '.*test.*'
        error_message: 'the value must contain the word test'
      - regexp: '.*example.*'
        error_message: 'the value must contain the word example'
2
3
4
5
6
7
8
9
10
11
Under the validations section, you have defined two regexp validations for this string field.
Validation:
regexp: The regular expression pattern to be applied to the field's value, '.*test.*'. and on the second validation: '.*example.*'.. This pattern checks if the value contains the word test and the second one check the word example. That means a sentence like this is a good test example will match the criterias.
error_message: The error message associated with this validation. If the validation fails (i.e., the word "test" and "example" are not present in the field's value), the error message 'the value must contain the word test/example' will be displayed.
In the validations array, you can include multiple regular expressions. When you define more than one validation, it's important to understand that all of these validations must be met for the field to pass validation. Think of it as an 'AND' operator from a logical perspective – all conditions need to be satisfied for the field to be considered valid.
With this YAML configuration, you've added specific regexp validations to ensure that the field value adheres to the specified patterns, and you've provided clear error messages to inform users when their input does not meet these criteria. This approach is a powerful way to enforce data quality and improve the integrity of your application's data
# Upcoming Enhancements
This feature is the initial step in our ongoing efforts to improve Stackforms. We are committed to enhancing our platform and providing you with new tools and features to optimize your data collection and processing capabilities.
# Inventory Widget
The inventory widget allows you to create a resource selector in a form that automatically selects resources from your Inventory based on the filtering criteria defined in the form's YAML syntax. This enhances the efficiency of form submission by simplifying the resource selection process.
Example:
  - name: "Aws VPC"
    key: aws_vpc
    widget: cy_inventory_resource
    type: string
    widget_config:
      attribute: id
      filters:
        attributes: 'tags.env[eq]=infra'
        type: aws_vpc
2
3
4
5
6
7
8
9
- name: The name of the selector.
- widget: Use
cy_inventory_resourceto specify the resource selector widget. - widget_config: This is where you configure the resource selector.
- attribute: Define the attribute used for the selection (in this case,
id).It's the "value" that you will get from this resource, and that you will expose as a variable. - filters: Set the filters based on your criteria, which may include attributes, provider, project, and more.
# Filtering Attributes
The attributes in the "filters" section should be aligned with the query parameters used in the console URL to filter assets in the inventory.
- attributes: This is a query string, the same one that is used on the console for filtering. In the example above, we are using it to filter on resource tags:
tags.env[eq]=infrafor filtering based on theenvtag and display only resources with the value 'infra'. Those attributes should be Terraform attributes. - provider: For filtering by the provider.
- type: Specify the type of resources you want to select (e.g.,
aws_vpc). - name: Filter the resources based on a name.
- module: Filter resources based on the Terraform module they belong to.
- label: The label is only set on custom resources, by the user.
- customattributes: It functions in the same manner as the "attributes" field but specifically targets custom attributes that users have assigned to custom resources.
# Generating configuration from Inventory
Ensure that your Inventory system is set up to recognize these filtering parameters and retrieve the relevant resources accordingly. The Inventory should be capable of dynamically populating the resource selector based on the filter criteria defined in the form YAML.
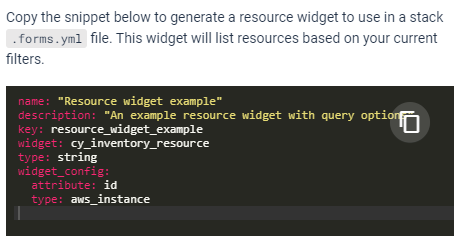
To create the filters for your YAML forms, you can easily generate them directly from the console. Just perform your desired filtering, and then click on the respective icon  .
.
With this feature, you can streamline the process of resource selection in your forms. Users will benefit from a more efficient and error-free experience as the resource selector will automatically show the relevant options based on the predefined criteria.