# Templates beta
Templates allows users to quickly start writing a stack by selecting a pre-defined template. Templates serve as a starting point for creating stacks and can be used to introduce features, define patterns, and establish best practices for teams to follow. This documentation provides an overview of the Stack Template feature, explains how to use existing templates, and provides guidance on writing custom templates.
# Using a template
When creating a stack within the Cycloid UI, you can start from a template by following these steps:
- Navigate to the Stacks section in the Cycloid UI.
- Click on the Create Stack button.
- Select the Create from template option.
- In the stack creation form, select the desired template from the available options.
- Customize the stack parameters and settings as needed.
- Click Create Stack to create the stack using the selected template.
Voilà, your stack is created!
Most often, the generated stack contains a README.md file that explains how to use it, and eventually what needs to be edited.
Using a template provides a foundation for your stack, including pre-configured resources, configurations, and other relevant settings. It enables you to start working on your stack more efficiently, saving time and effort.
# Writing your own templates
Cycloid allows you to create custom stack templates tailored to your specific use cases.
# Template structure
A template is nearly identical to a stack, with similar structure and files. It needs a .cycloid.yml file, and may contain a pipeline, Terraform modules, Ansible playbooks, a README.md file and any other relevant files.
The only differences are:
- Template
.cycloid.ymlfiles must have thetemplateattribute set totrue. - Template
.cycloid.ymlcan have thetemplate_ignoreattribute set to a list of paths inside the template file tree. - Templates can take advantage of pongo2 templating.
For example, given the following directory structure:
.
├── .cycloid.yml
├── .forms.yml
├── README.md
├── pipeline
│   ├── pipeline.yml
│   └── variables.sample.yml
└── terraform
    └── provider.tf
2
3
4
5
6
7
8
9
With the following .cycloid.yml file:
version: 2

name: Template                         # The name of the template
canonical: template-canonical          # The unique canonical of the template
author: '{{ stack_author }}'           # The author of the template
description: 'A template description.' # The template description
template: true                         # The attribute that differentiate a template from a stack.
template_ignore:                       # The list of paths inside the template that will not be rendered.
  - 'ansible/**'

config:
  default:
    name: 'Default'
    pipeline:
      pipeline:
        path: 'pipeline/pipeline.yml'
      variables:
        path: 'pipeline/variables.sample.yml'
        destination: '($ project $)/pipeline/variables-($ environment $).yml'
2
3
4
5
6
7
8
9
10
11
12
13
14
15
16
17
18
19
Templates, just like stacks, need to be imported in catalog repositories. You may have catalog repositories dedicated for templates, or even have templates and stacks together in a single repo.
# pongo2 templating
Templates rely on the pongo2 templating engine (opens new window), a Django-syntax like templating-language for Go. pongo2 allows you to embed dynamic content and logic within your templates through the use of variables, filters and tags. The template files are compiled when the stack is created.
{# This is a short example to give you a quick overview of pongo2's syntax. #}
echo "author: {{ stack_author }}"

{% if stack_usecase == "aws" %}
echo "Provider: Amazon Web Services"
{% elif stack_usecase == "gcp" %}
echo "Provider: Google Cloud Platform"
{% endif %}
2
3
4
5
6
7
8
See the Django documentation (opens new window) for more info on the syntax.
Note
pongo2 templating is only available in stack templates, and not in stacks themselves.
# Ignored templating paths
In some cases the template make use of technologies that provide a templating of their own, such as ansible for example, and this can interfere with the pongo2 engine.
In order to support these kind of use cases you can use template_ignore field in the cycloid.yaml.
The template_ignore field is not mandatory, holds a list of paths, and support globbing.
Any file matching the globbing will not be rendered by the pongo2 engine.
For example, given the following directory structure:
.
├── .cycloid.yml
├── .forms.yml
├── README.md
├── pipeline
│   ├── pipeline.yml
│   └── variables.sample.yml
├── terraform
│   └── provider.tf
└── ansible
    └── site.yaml
2
3
4
5
6
7
8
9
10
11
With the following .cycloid.yml file:
version: 2

name: Template                         # The name of the template
canonical: template-canonical          # The unique canonical of the template
author: '{{ stack_author }}'           # The author of the template
description: 'A template description.' # The template description
template: true                         # The attribute that differentiate a template from a stack.
template_ignore:                       # The list of paths inside the template that will not be rendered.
  - 'ansible/site.yaml'

config:
  default:
    name: 'Default'
    pipeline:
      pipeline:
        path: 'pipeline/pipeline.yml'
      variables:
        path: 'pipeline/variables.sample.yml'
        destination: '($ project $)/pipeline/variables-($ environment $).yml'
    ansible:
        path: 'ansible/site.yaml'
        destination: '($ project $)/ansible/variables-($ environment $).yml'
2
3
4
5
6
7
8
9
10
11
12
13
14
15
16
17
18
19
20
21
22
If at stack creation time we choose the default use case, the ansible/site.yaml file will not be rendered with the pongo2 engine.
Everything else will work as expected, the ansible file will be copied in the config repository in the configured location.
In addition the ignored paths support globbing, for example:
template_ignore:
  - 'ansible/site.yaml'             # This matches the full path of the file
  - 'ansible/*.yaml'                # This matches all the files ending with .yaml
  - 'ansible/*'                     # This matches all the files, but not the subdirectories
  - 'ansible/**'                    # This matches all the files and the subdirectories
2
3
4
5
# Variables
Several variables are exposed and can be used within your stack templates:
| Variable name | Description |
|---|---|
api_url | The URL of the Cycloid API |
stack_author | The username of the user who creates the stack |
stack_canonical | The stack canonical filled in by the user |
stack_path | The path of the generated stack in the catalog repository |
stack_usecase | The key of the selected use case |
scs_canonical | The canonical of the target catalog repository |
scs_cred_path | The path in Vault of the target catalog repository credential |
scs_cred_type | The type of the target catalog repository credential (ssh or basic_auth) |
# README files
A template may contain a README.md file, which will be copied over to the stack. Upon creating a stack from a template, users will be redirected to the stack details page where the stack README is displayed. It's a good idea to rely on this README to guide users on how to use and manipulate their stack.
# Multi use-cases templates
Like stacks, templates may include multiple use-cases to cover a variety of scenarios. When selecting a multi use-cases template, users will have to select the desired use-case to use in their stack. The output stack will only contain the selected use-case, making the stack easier to understand.
Note
Templates cannot generate multi use-cases stacks. Only a single use-case will be kept when generating a stack.
When a template use-cases are very similar, with only small differences, they can be combined in a single files by using pongo2 templating to handle the differences. See this example provider.tf file:
variable "organization" {}
variable "project" {}
variable "env" {}

{% if stack_usecase == "aws" %}
provider "aws" {
  access_key = var.aws_cred.access_key
  secret_key = var.aws_cred.secret_key
  region     = var.aws_region
  default_tags {
    tags = {
      "cycloid.io" = "true"
      env          = var.env
      project      = var.project
      organization = var.organization
    }
  }
}
variable "aws_cred" {}
variable "aws_region" {
  description = "AWS region to launch servers."
  default     = "eu-west-1"
}

{% elif stack_usecase == "gcp" %}
terraform {
  required_providers {
    google = {
      source  = "google"
      version = "~> 2.18.0"
    }
  }
}
provider "google" { project = var.gcp_project }
variable "gcp_project" { default = "cycloid-demo" }
variable "gcp_zone" { default = "europe-west1-b" }
{% endif %}
2
3
4
5
6
7
8
9
10
11
12
13
14
15
16
17
18
19
20
21
22
23
24
25
26
27
28
29
30
31
32
33
34
35
36
37
But in other situations, use-cases can be widely different and require specific files. In this scenario, use-case specific files can be organized in folders named after the use-case keys (as defined in .cycloid.yml), placed in a extra-templates directory located at the root of the template.
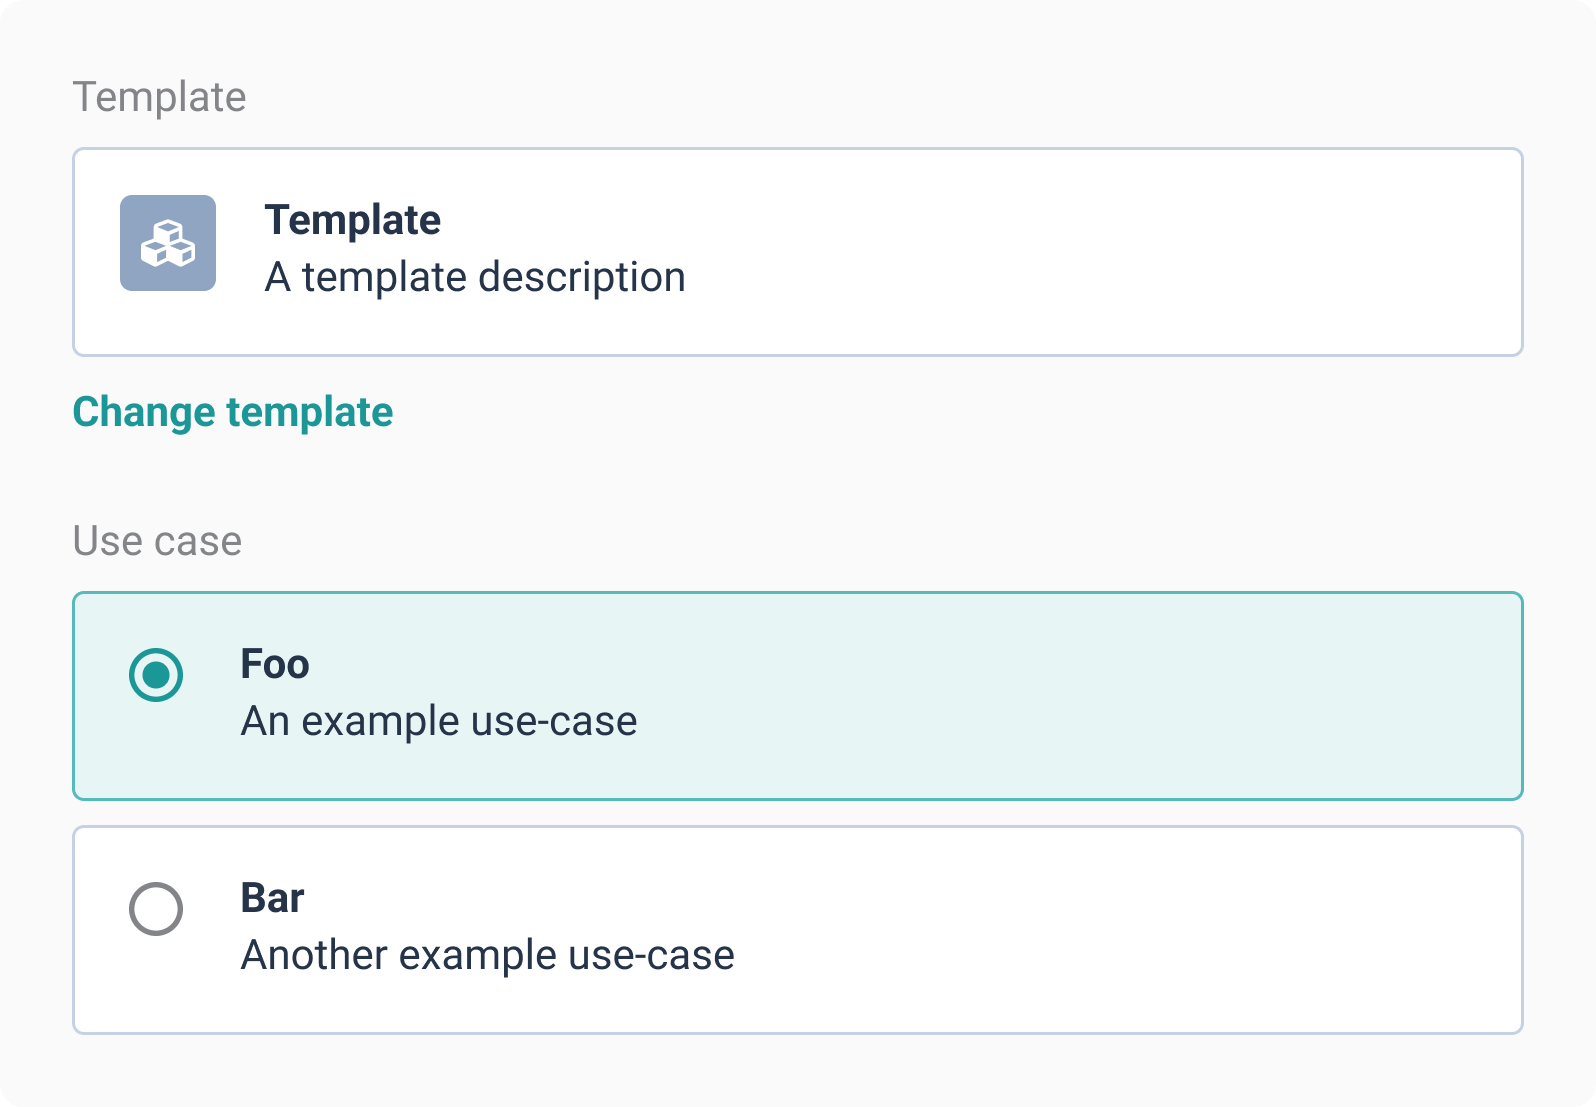
Given the following .cycloid.yml definition, where we define two use-cases:
version: 2

name: Template                         # The name of the template
canonical: template-canonical          # The unique canonical of the template
author: '{{ stack_author }}'           # The author of the template
description: 'A template description.' # The template description
template: true                         # The attribute that differentiate a template from a stack.

config:
  foo:
    name: 'Foo'
    description: 'An example use-case'
    pipeline:
      pipeline:
        path: 'foo-pipeline.yml'
      variables:
        path: 'foo-variables.sample.yml'
        destination: '($ project $)/pipeline/variables-($ environment $).yml'
  bar:
    name: 'Bar'
    description: 'Another example use-case'
    pipeline:
      pipeline:
        path: 'bar-pipeline.yml'
      variables:
        path: 'bar-variables.sample.yml'
        destination: '($ project $)/pipeline/variables-($ environment $).yml'
2
3
4
5
6
7
8
9
10
11
12
13
14
15
16
17
18
19
20
21
22
23
24
25
26
27
And considering we need two entirely different pipelines for the two use-cases, we can use the following template directory structure:
.
├── .cycloid.yml
├── .forms.yml
├── README.md
└── extra-templates
    ├── foo # Folder name matches the use-case key
    │   ├── foo-pipeline.yml
    │   └── foo-variables.sample.yml
    └── bar # Folder name matches the use-case key
        ├── bar-pipeline.yml
        └── bar-variables.sample.yml
2
3
4
5
6
7
8
9
10
11
When creating a stack with the use-case foo, files and folders placed under extra-templates/foo/ will be moved in the template root directory, and the extra-templates directory removed. Files from extra-templates/foo/ will overwrite any file with the same name already present in the template root directory.
Following our previous example, creating a stack with the foo use-case would give us the following directory structure:
.
├── .cycloid.yml
├── .forms.yml
├── README.md
├── foo-pipeline.yml
└── foo-variables.sample.yml
2
3
4
5
6
And here is what users will see when selecting this template:
# Enabling Cycloid templates
Cycloid maintains a set of basic templates (opens new window) that serve as a starting point for writing your first stacks. These templates showcase minimal and well-documented examples, providing a solid foundation for building your own stacks and exploring the capabilities of Cycloid.
To access Cycloid templates, create a catalog repository configured with the https://github.com/cycloidio/bootstrap-stacks.git URL on the master branch. This repository is public and doesn't require credentials.
Once the configuration is complete, you will be able to see and select Cycloid templates when creating stacks in the UI. These templates provide a foundation for building your own stacks and exploring the capabilities of Cycloid.
Note
If you are unable to see Cycloid templates, ensure that your catalog repository is properly configured and linked to the correct GitHub repository.